As a designer in the food industry images are insanely important. Most of the images that I use are ones that I’ve photographed, but there are times when I have to use other peoples photos as well. But lets face it, not everything goes according to plan while photographing, and the screen on your camera may not always have an accurate display of what “white” is.
Having dealt with a few designers now, who have a remarkable eye for hierarchy, design, typography, etc, but when it comes to accurately white balancing in photoshop this is where they have their low point. Not that to be a designer you need to know photoshop, but it does help if you want to own the full design. Also if there is a quick deadline, it’s harder to get a photographer last minute than just to do it yourself.
In this Quick Tip Monday, I will show you my personal process of getting the images print ready. Though most of my work is in print, this could apply to anything that you are doing that needs a white background. Also since I’m filled with laziness, I will also show you how I was able to remove the crumbs and spilt “juice” that ended up on the board.d
1. The Original Image
This is the original image that was taken straight from the camera. As you can see, while it is on a white board, it is not completely white.
2. Import into Photoshop

Bring the image into photoshop. The only panels that I use when white balancing are The Navigator, Adjustments and Layers.
3. Use the levels to find “white”
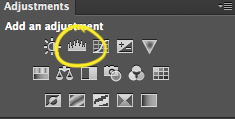
Use the levels button on the Adjustment panel.
Take the “sample image to set white point” tool
After playing around with the white point tool for a while I found that somewhere in this shadow area was the perfect location to white balance the berries to seem like they were coming from an angelic place to give the berries more appealing.
4. Clean up the image
As you can see there were some crumbs from a previous photo, as well as the black berries found themselves staining by white board. One of the easiest ways to fix this by placing a piece of wax paper underneath the product. I didn’t have any on had when photographing, so as I said previously, I get lazy and find it faster to fix this in post than to go to the store to pick up a tube of wax paper.
Use the healing brush to clean up these flaws. 
These are the settings that I have on my healing brush.
Use the brush to go over each crumb individually, the messier you are, the more time it takes. But that’s what laziness brings you.
 This is what the image looks like after it has been cleaned up.
5. Final Touches
While the image is white balanced and could theoretically be placed on a package, slide or whatever. I like to make my images flow to white so that who ever uses it, for which ever reason will be able to make it look professional. Chances are this will end up in the hands of a non designer to be placed on a document, and it just kills me to see it being used wrong (or worse they mess with the aspect ratio)
First thing I do is crop the image to a more user friendly size.
ALWAYS make sure that this stays unchecked. This is my favorite thing about using the latest versions of photoshop since it makes your crop not final.
Make a new layer, fill it with solid white.
Take the marquee tool and make a square close to the edge, but leaving a decent amount of space.

Delete this area. This will show you what the image would look like against solid white.
Make a new layer and make a large (I used a 400pt) brush at 0% hardness. Move this over the areas that are close to your white boarder to once again make sure it blends easily to white.
6. The Final Product
 Here is the final product, easily able to be placed in many different application.
This was my very first tutorial . If you have any advise about creating tutorials or if I missed some details please let me know. Also feel free to give any other ideas and suggestions that you have for white balancing a photo.


